SolidWorks 2019: 3D Textures
3D Textures in SolidWorks 2019
For too long adding small detailed textures to parts and surfaces was a tedious and time demanding task in SolidWorks. We were forced to rely on patterns and manual adjustment to create the perfect match between texture and surface. In some instances, these textures are purely cosmetic and have no actual 3D geometry. However, this painful task is now a thing of the past thanks to SolidWorks 2019’s new feature, 3D textures. This feature allows for quick texture application of any image, shape, logo that you can imagine to any surface.
Picking a Texture
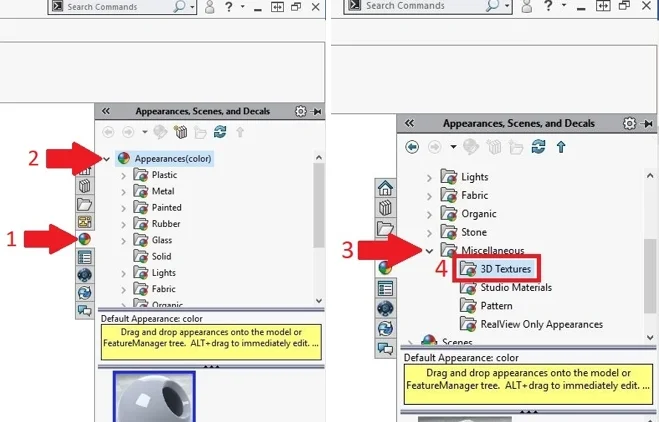
This new feature gives you the ability to take any image you like and turn it into a texture in SolidWorks. The new 3D texture feature uses grey scales to give images 3D properties. Therefore, any image can be used for a texture if it can be turned into a grey scaled image and brought into SolidWorks. SolidWorks also offers multiple grey scaled texture images in its base files. These files can be found in the appearances, scenes, and decals tab in the resource task pane. In the tab, click on appearances, then scroll down to miscellaneous, then click on the 3D Textures folder. Here is where you will pick what texture you would like to apply. File path shown in Figure 1.
Figure 1: Base 3D Texture Files
Applying Textures
Once the desired texture has been chosen, it is as simple as dragging and dropping that texture to the model. The texture can be applied to a single surface/face or the entire body. Multiple different textures can be applied to a model and turned into textures. However, you cannot mix two textures together on one face. Drag and Drop example shown below in Figure 2.
Figure 2: Drag and Drop 3D Texture to Surface
Refining the Texture
After a texture image has been applied to a surface or body, it can then be edited to change its angle, size, location, color intensity, and much more. Texture images can be edited by right clicking on the surface with the desired texture, opening the appearances, then double clicking on the face with the texture pattern. An example of this method is show below in Figure 3. Another way to edit a texture is by opening the Display Manager in the feature manager tree and selecting the desired texture pattern from there. Once the texture has been edited, its time to give it some 3D geometry.
Figure 3: Edit Texture Option Location
Applying Geometry
The 3D Texture tool can be found in the insert tab, clicking on the features drop down menu, then selecting the 3D Texture tool. The 3D Texture tool can also be found by using the search bar, or by expanding the solid bodies folder in the feature manager tree and right clicking on the feature with the texture and selecting the tool. Location of the tool in the feature manager shown below in Figure 4.
Figure 4: 3D Texture Tool Location in the Feature Manager Tree
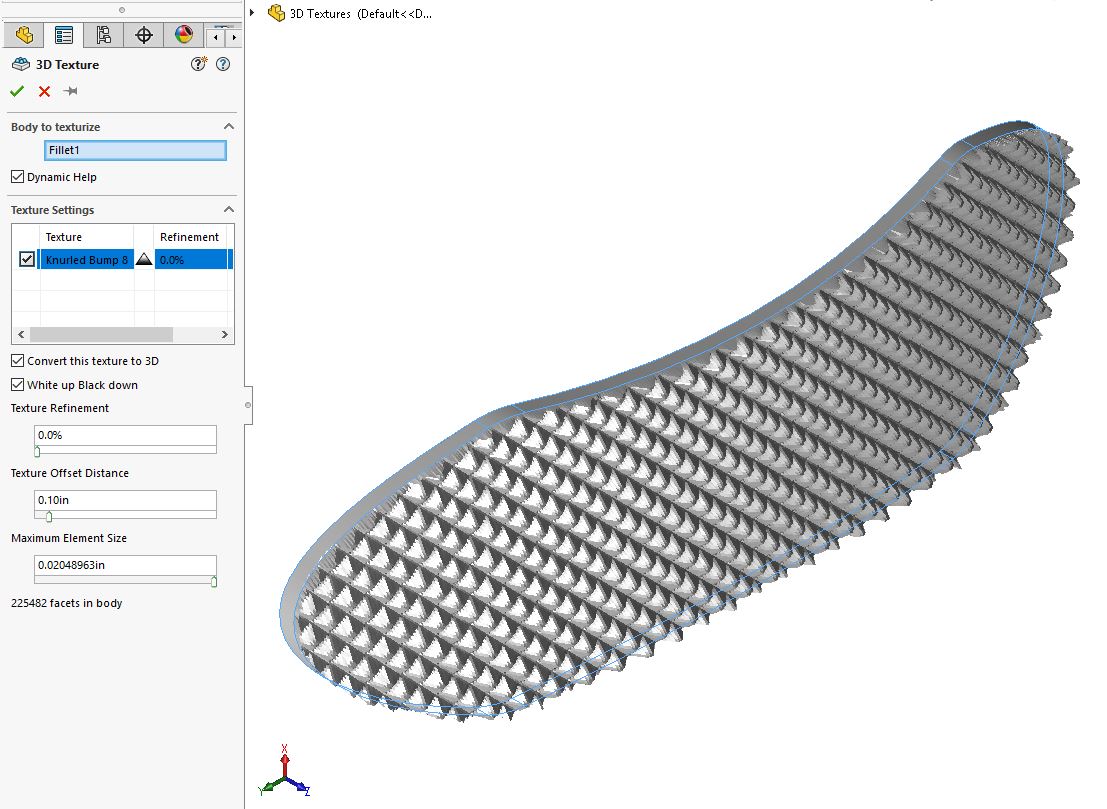
After the tool is selected, the feature manager will display all possible 3D textures under the texture setting. Click the check box next to the textures you would like to make 3D. At the bottom of the feature manager are three sliding bars, these control the element size, texture refinement and offset distance that the texture will be. Dragging the maximum element size and the texture refinement bar all the way to the right will give the most defined and accurate geometry. However, this increased intensity of the texture mesh will take a toll on the overall speed within the model. Applying 3D textures should be the final step in creating the model. This is due to the model becoming a mesh body after applying any 3D textures. An Example of the 3D texture feature manager is shown in Image 5 below.
Figure 5: 3D Texture Feature Manager
Final Thoughts
The new 3D texture tool is a fantastic edition to the SolidWorks arsenal of features. This tool will help save companies time in both the prototype and production phase. Because this tool applies actual 3D geometry to the model, these new texture features can be 3D printed right onto the part! 3D textures push a SolidWorks model the extra mile when it comes to both realism and communicating the design intent.
Thanks for reading, for any inquiries or contracting services, please don't hesitate to reach out to us!


