SolidWorks: Quick Rendering and Shadowing
Creating quick renderings without wasting time waiting for the model to load is a balancing act. Renderings usually take some time as the SolidWorks models updates its appearance. At Perception Engineering, we take render screen shots for quick customer reports but without shadows. The lighting effect of shadows by the models are not something we are generally interested in when developing reports for customers.
There are two main options that can be used for Renderings. These options are PhotoView 360 and Visualize. PhotoView 360 is built into SolidWorks and can be used to make quick renders from within the program. Visualize is a standalone program that can be used to make professional quality renderings. PhotoView 360 is the best option when there are a lot of changes yet to be made to your model or you don’t need the highest quality. Visualize is the best option when your model is done or has very few changes to be made, or you need professional grade renderings for consumer viewing. Between the two options, PhotoView 360 is faster, as it is built into the SolidWorks program.
Before the Render Tools are accessible, enable the PhotoView 360 in SOLIDWORKS Add-Ins. To generate a quick render, click:
Render Region
Integrated Preview
Remove Shadows
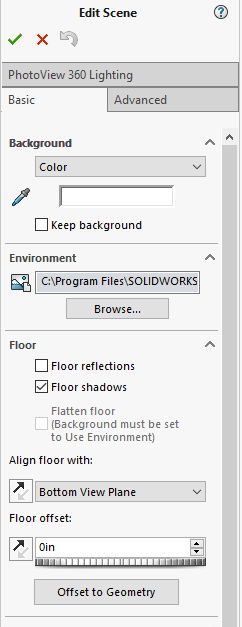
Often the render will generate a shadow which gives the report a bad look. To remove the shadows in SolidWorks quick render, enable shadows in the view settings (I know, this sounds contradictory).
While in the Render Tools interface, click on Edit Scene and deselect Floor shadows in the Basic properties tab.
I hope this helps with creating appealing images! Feel free to contact us if you have any questions or if you require our contract services! Thanks for reading our blog!


