Virtual Reality: HTC Vive Set up Through SteamVR
HTC Vive Setup Through SteamVR
In this blog, we will be going through the steps to get the HTC Vive ready for use with a walkthrough of SteamVR. We will also hit some requirements on the recommended computer side of things and some issues during the setup and how to identify the problem.
Virtual Reality Setup
Setting up virtual reality for a PC can be a quick and easy process if done correctly. For this guide, we will be walking through setting up the HTC Vive. We will be touching on some items that are required before the setup process can begin, the actual process through Steam, and some issues that can occur and how to correct them.
Required Items
Apart from the VR headset itself, there are a couple of items that are needed in order to jump into the virtual world. The biggest of them all is a computer that can meet the minimum requirements set in place by the headset companies. Many of these specs will be listed on their websites. Below, I will list the recommended computer specs to run the HTC Vive.
*Processor: Intel Core i5-4590 or AMD FX 8350, equivalent or better
*Graphics: NVIDIA GeForce GTX 1060 or AMD Radeon RX 480, equivalent or better
*Memory: 4 GB RAM or more
*Video Output: 1x HDMI .14 port, or Display Port 1.2 or newer
*USB: 1x USB 2.0 port or newer
*Operating System: Windows 7 SP1, Windows 8.1 or later or Windows 10
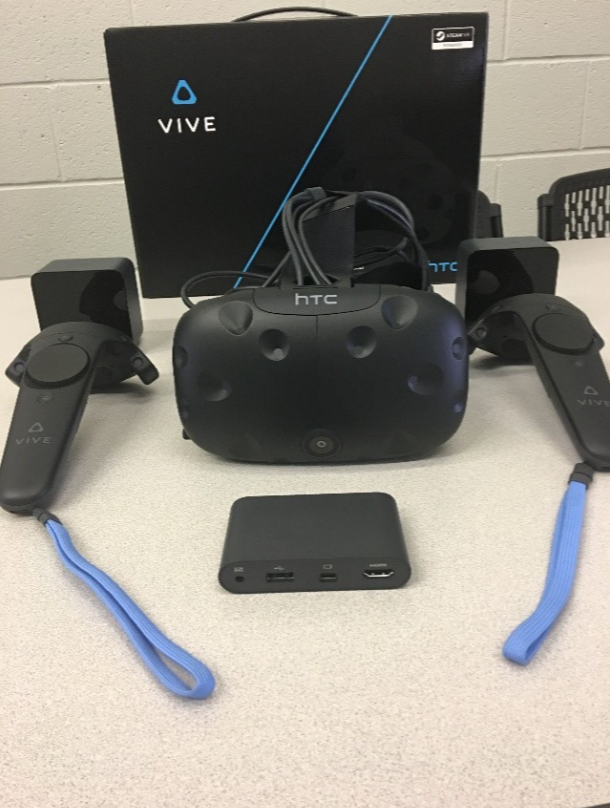
Figure 1: Unboxed HTC Vive Set
Hitting these recommended computer specs is a large portion of having the virtual reality headset run properly and ensuring good performance. This can be a little costly, from around ~$700 to ~$4,150 for prebuilt PCs, but it is worth it if you want an optimal VR experience.
Another item required is space! This is something that can be overlooked and ignored but can make all the difference. There is always the potential of bumping or running into objects around the house or office. This can lead to tripping or damaging house or office items which is never a good thing! The controllers are fairly durable, but after extended bumping and hitting of things, they may become damaged and potentially fail to work.
Setting up Through Steam
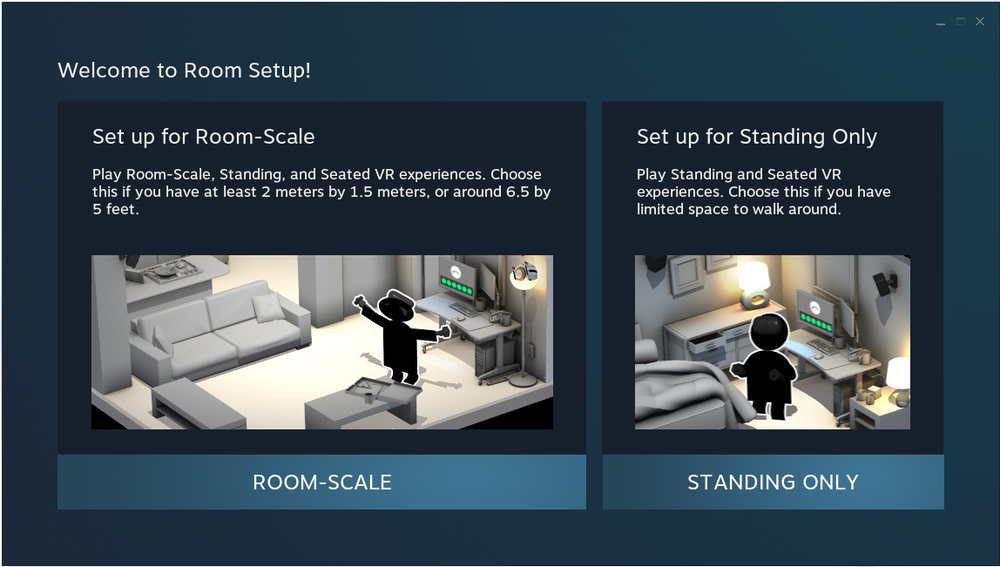
Steam is one of the only ways to allow the computer to recognize and run an HTC Vive headset. This software is very well known as a gaming platform but has in the past couple years become the go-to service for anything VR. Before setting up through Steam, the base station should be placed in order to track both the headset and controllers. It is recommended that they’re mounted above the user’s head and placed in opposite corners of the area being used while being no further than 16.4 feet apart. Next is going through Steam VR. This setup process is very well done, easy to follow, and descriptive to ensure no issues. When you first plug in your HTC Vive, the SteamVR setup will automatically start up. The first option that comes up is whether the user would like to setup for room scale or standing room
Figure 2: Welcome to Room Setup!
only. Room scale allows for the user to walk around in a selected space while standing only is used if there isn’t much area to use VR or if the user would like to sit. For this blog, we will be using room scale. Next, space needs to be created to minimize the potential of tripping and bumping into things. From there, the controllers will need to be turned on and placed with the headset in an area that can be seen by both tracking stations.
Figure 3: Establishing Tracking
Once the controllers can be seen by both base stations, the next step is to grab a controller, stand in the middle of the play area, and point the controller at the computer monitor while holding down the trigger on the back.
Figure 4: Locating your Monitor
The next step is the easiest step of all: locating the floor by placing both controllers on the ground and selecting the calibrate floor option in SteamVR.
Figure 5: Locating the Floor
The final step in the setup process is measuring the space of the area being used while in VR. Luckily, there are no worries about having to grab a tape measure and inputting numbers into the computer. SteamVR allows the user to use a controller to walk around the play area and the software will track the path and create a real-time image of what has been tracked! One potential issue here is not mapping out enough play area. The software will give an error to go back through and remeasure until the appropriate amount of space has been created.
Figure 6: Trace your Space
The setup process is now complete! The HTC Vive is ready to be used for whatever application the user wishes. Now anytime the HTC Vive is disconnected, or the computer is turned off, SteamVR will remember and retain all of the information from the initial setup process. So, for most applications, it is just plugged and play to enter the virtual world!
Figure 7: Setup Complete
Troubleshooting
With the setup process all laid out, there are some potential issues that may arise. One issue, for example, is during the measuring out of the play area. If enough area isn’t mapped out, the software will give an error of a red play area and prompt the user to go back through and remeasure until the appropriate amount of space has been created. If enough area can’t be created, it is recommended to start over and select the standing only option.
Figure 8: Error Mapping User Area
Another potential issue is during the established tracking section. You will not be able to progress to the next section if either the headset or controllers are not highlighted green in the Steam window. There may be a couple of reasons why these items aren’t green. One reason may be that the controllers are not turned on. This is fixed by turning on the controllers or charging them if they’re dead and doing the set-up process at a different time. Another reason for this could be the base stations can’t see each other and therefore can’t track the headset or controllers. This can be fixed by adjusting the base stations to see each other and see the play area.
Please do not hesitate to get in touch with us if you have any questions or are in need of contract services. We are always here to help!


